BasideWT- Whole Home Water Filtration System & Replacement


How To Change Whole House Water Filter?
Having clean, filtered water flowing throughout your home is essential for both health and convenience. Whole house water filtration systems are an excellent way to ensure that the water you use for drinking, cooking, bathing, and cleaning is free from contaminants. However, like all filters, whole house water filters need to be replaced periodically to maintain optimal performance.
In this blog, we’ll guide you through the process of changing your whole house water filter. Whether you’re a DIY enthusiast or simply looking to save on professional maintenance costs, this step-by-step tutorial will walk you through the process.
Why is Changing Your Whole House Water Filter Important?
Before we get into the specifics of how to change a whole house water filter, let’s first discuss why it’s so crucial. Over time, your filter accumulates sediment, chlorine, heavy metals, and other impurities. If you don’t replace the filter as needed, it can become clogged and less effective at cleaning your water. A clogged filter can also reduce water pressure and even cause the filter to leak.
Regularly changing the filter ensures that your system is working efficiently and that the water you’re using stays safe and clean.
How Often Should You Change Your Whole House Water Filter?
The frequency of filter changes depends on a few factors, such as the type of filter you use, the water quality in your area, and your household’s water usage. On average, you should aim to change your whole house water filter every 3 to 6 months.
Here are some signs that it may be time to change your filter:
- Reduced water pressure: A clogged filter can restrict water flow, leading to lower pressure.
- Unpleasant taste or odor: If your water starts to taste or smell bad, it could mean your filter is no longer doing its job effectively.
- Visible dirt or discoloration: If you notice sediment or discoloration in your water, it’s a clear indication that the filter is saturated and needs replacing.
Tools You’ll Need
Before you get started, make sure you have the following tools on hand:
- A new whole house water filter (make sure it’s the correct size and type for your system)
- A filter wrench (if needed)
- A bucket or container (to catch any water that may spill when you remove the old filter)
- Towel or cloth (for cleaning any spilled water)
- Gloves (optional, but recommended for handling the filter)
Step-by-Step Guide to Changing Your Whole House Water Filter
Step 1: Turn Off the Water Supply
Safety first! Before you do anything, you need to turn off the water supply to your filtration system. Most whole house water filtration systems will have a valve to shut off the water. If you’re unsure where this valve is located, it’s usually near the water meter or the point where your main water line enters the house.
Once the valve is closed, open a faucet in your home to relieve any built-up pressure in the pipes.
Step 2: Relieve Pressure from the System
To prevent water from spraying when you open the filter housing, it’s a good idea to relieve any residual pressure in the filtration system. You can do this by briefly opening a faucet at the lowest point in your house (such as a basement sink or outdoor spigot). Allow the water to flow out until it stops. This step ensures that there is no water trapped inside the filtration unit.
Step 3: Remove the Old Filter
Now that the pressure is relieved, you can remove the filter housing. Most whole house filters come with a filter wrench to help you loosen the housing. Place a bucket or towel beneath the filter housing to catch any water that may spill out when you open it.
- Use the filter wrench: Place the wrench around the housing and turn it counterclockwise. If it’s too tight, a little elbow grease may be needed, but be careful not to crack the housing.
- Remove the filter: Once the housing is loose, carefully remove it from the filter head. You should now be able to take out the old filter.
Step 4: Clean the Filter Housing
While you have the filter housing removed, it’s a good opportunity to clean it. Over time, mineral deposits and sediment can accumulate inside the housing. Use a soft cloth or sponge and warm water to clean the inside of the housing. Make sure there is no mold or debris before inserting the new filter.
If necessary, you can also use a gentle, non-abrasive cleaning solution to remove stubborn buildup. Be sure to rinse thoroughly before proceeding.
Step 5: Install the New Filter
Now that the housing is clean, it’s time to install the new filter. Here’s how to do it:
- Place the new filter into the housing: Gently insert the new filter into the filter housing. Make sure it fits securely and is aligned properly with the housing.
- Check for O-rings: Ensure that the O-ring (a rubber seal) around the housing is in good condition. If it’s worn out or cracked, replace it to prevent leaks. Lubricating the O-ring with a bit of food-safe silicone grease can help create a better seal.
Step 6: Reassemble the Filter Housing
Once the new filter is in place, it’s time to reassemble the filter housing. Carefully screw the housing back onto the filter head, making sure it’s tightly sealed. You don’t want to overtighten, but it should be snug enough to prevent leaks.
Step 7: Turn the Water Supply Back On
With the filter securely in place, it’s time to turn the water supply back on. Slowly open the main water valve and check for any leaks around the filter housing. If you notice any, turn off the water and make sure the housing is properly seated.
Step 8: Flush the System
After replacing the filter, it’s a good idea to flush the system. Turn on a faucet closest to the filtration system and let the water run for a few minutes. This helps to clear out any air bubbles or loose particles left in the system from the filter change.
You may notice the water is slightly cloudy or has an odd taste during the first flush — this is normal and should clear up within a few minutes.
Step 9: Check for Leaks
Finally, check the entire filtration system for any signs of leaks. If you spot any, tighten the filter housing a bit more or inspect the O-ring to make sure it’s in place.
Tips for Maintaining Your Whole House Water Filter
- Regularly inspect your filter: Even though you’re changing the filter every 3-6 months, it’s a good idea to inspect the system periodically for any signs of wear and tear.
- Keep track of your filter changes: Mark your calendar or set a reminder on your phone to ensure you never forget to replace the filter on time.
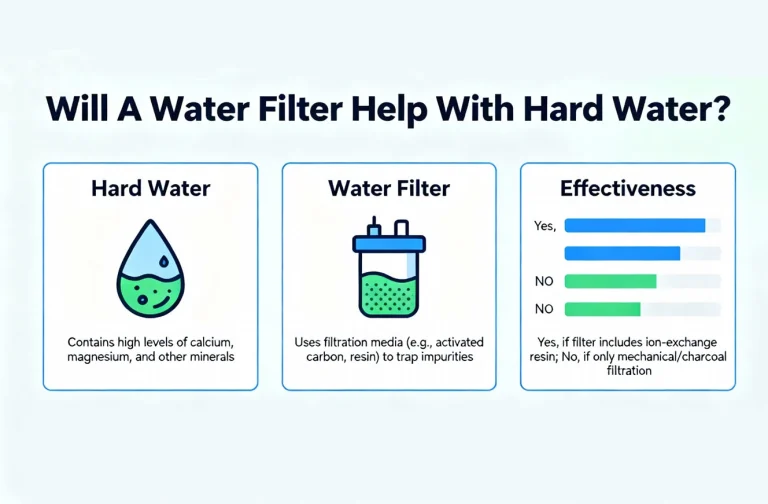
- Consider a water softener: If you live in an area with hard water, consider installing a water softener in conjunction with your whole house filter to prevent mineral buildup in your pipes and fixtures.