BasideWT- Whole Home Water Filtration System & Replacement


RO Water System Installation Guide: Step-by-Step Process for Home & Commercial Use
Installing a new filtration unit can feel overwhelming if you don’t know what to expect. This RO Water System Installation Guide walks you through every stage of the process, from choosing a location to flushing the lines for the first time.
Whether you’re setting up a small under-sink unit or a larger commercial system, proper installation directly affects water quality, system lifespan, and daily performance. A rushed or incorrect setup often leads to leaks, low water pressure, or membrane damage within the first few months.
In this guide, you’ll learn what tools and parts you need, how to prepare your space, and the exact steps professionals follow. You’ll also find checklists, comparison tables, and expert tips to help you avoid the most common mistakes homeowners and business owners make.
What Is an RO Water System Installation Guide?
An RO Water System Installation Guide is a structured resource that explains how to set up a reverse osmosis system correctly, from unboxing to final testing.
It covers everything needed to connect a filtration unit to your water supply safely. This includes plumbing connections, filter placement, drainage, and pressure checks.
A good installation guide isn’t just about following steps. It’s about understanding why each step matters, so you can troubleshoot issues later without calling a technician for every small problem.
This matters because reverse osmosis systems rely on a specific sequence of filtration stages. Understanding the order in which water moves through the unit makes it much easier to diagnose problems if something goes wrong after setup. To see exactly how each stage functions once water starts flowing, our article on how an RO water system works explains the process stage by stage.
Knowing the mechanics behind the system also helps you make smarter decisions during installation itself, such as where to place each filter housing and why certain connections must go in a specific order.
Why Proper Installation Matters
Correct installation protects your investment. A poorly installed RO system can waste water, reduce filtration efficiency, or even damage your kitchen cabinetry through leaks.
Many performance complaints trace back to installation errors rather than product defects. Loose fittings, missing O-rings, and incorrect tubing lengths are common culprits.
For a broader look at how these systems work as a whole, our RO Water System Complete Guide covers types, benefits, and long-term maintenance in more depth.
Proper setup also affects taste and safety. Air trapped in the lines, unflushed carbon fines, or a poorly seated membrane can all affect the water coming out of your faucet.
Components Required
Before you begin, gather every part so you’re not searching mid-installation. Most residential kits include the following:
| Component | Function |
|---|---|
| Sediment pre-filter | Removes dirt, rust, and sand particles |
| Carbon pre-filter | Removes chlorine and odors |
| RO membrane | Removes dissolved contaminants |
| Post-carbon filter | Polishes taste before the faucet |
| Storage tank | Holds treated water for use on demand |
| Faucet | Dedicated tap for filtered water |
| Drain saddle | Connects drain line to household plumbing |
| Feed water adapter | Connects system to cold water supply |
Commercial systems typically add booster pumps, larger membranes, and multi-stage pre-treatment depending on water volume needs.
Some kits also include a check valve, which prevents treated water from flowing backward into the membrane housing. This small part protects membrane integrity and extends its usable life.
If you’re comparing kits before purchase, pay attention to the number of filtration stages listed. A 4-stage system suits most households, while a 5- or 6-stage system adds extra polishing or remineralization for better taste.
Tools Required
Having the right tools on hand speeds up installation and reduces the risk of damaging fittings. You’ll generally need:
- Adjustable wrench
- Phillips and flathead screwdrivers
- Tubing cutter
- Drill with a 1/2-inch or 3/8-inch bit (for faucet holes)
- Teflon tape
- Bucket and towels for spills
Most manufacturers include tubing and basic fittings, but a tubing cutter ensures clean, leak-free connections.
A flashlight is also useful for inspecting tight spaces under the sink, especially in cabinets with limited lighting. Keep a small container nearby to hold screws and fittings so nothing gets lost during the process.
For commercial installations, technicians often also carry a pressure gauge, a multimeter for pump wiring, and pipe thread sealant rated for potable water use.
Pre-Installation Checklist
Before touching any pipes, confirm these details. Skipping this stage is one of the biggest reasons installations go wrong.
- Confirm available space under the sink or in the utility area
- Check incoming water pressure (ideally 40–80 psi)
- Verify cold water supply line location
- Confirm drain access near the P-trap
- Check for an available electrical outlet if using a pump
- Review whether you need a commercial RO system instead of a standard residential unit
Completing this checklist first prevents mid-project surprises, especially in older homes with unusual plumbing layouts.
Choosing the Installation Location
Location affects both convenience and long-term performance. Under-sink installation is standard for residential use because it keeps the system close to the faucet and drain.
For commercial setups, a dedicated utility closet or mechanical room usually works better. This allows room for larger tanks, pumps, and pre-filtration stages.
Avoid locations near heat sources, since high temperatures can degrade membrane performance over time. Also avoid tight spaces that make future filter changes difficult.
Ventilation matters too. A slightly open cabinet or vented panel helps prevent moisture buildup around the housings, which can otherwise encourage mold growth in humid climates.
Under-Sink vs Whole-Building Installation
Not every installation looks the same. Homeowners often choose a compact under-sink unit, while larger properties and businesses may need a centralized setup feeding multiple outlets.
| Setup Type | Typical Use | Installation Complexity |
|---|---|---|
| Under-sink unit | Single kitchen faucet | Low |
| Point-of-entry system | Whole-house filtration | Moderate to high |
| Commercial multi-stage system | Restaurants, offices, clinics | High |
Whole-building installations usually require professional plumbing work, additional piping runs, and sometimes a dedicated electrical circuit for booster pumps.
Water Pressure Requirements
Water pressure is one of the most overlooked factors in RO system performance. Most residential membranes need at least 40 psi to function efficiently.
If your home’s pressure falls below this, a booster pump becomes necessary. Without one, water production slows significantly and the system may struggle to fill the storage tank.
For a deeper technical explanation of pressure and permeate flow, the Water Quality Association’s educational resources offer helpful background on how filtration systems respond to varying feed pressures.
Too much pressure can also cause problems, including membrane stress and premature wear. Pressure-reducing valves help maintain a safe, consistent range.
If your home relies on well water, pressure can fluctuate more than with municipal supply. In these cases, installing a pressure tank ahead of the RO system helps stabilize flow and protect the membrane from sudden spikes.
Testing pressure at the exact point where the system will connect, rather than at a different faucet, gives you the most accurate reading before installation begins.
Step-by-Step Installation Process
Once your checklist is complete and your location is chosen, installation generally follows this order:
- Turn off the cold water supply valve
- Install the feed water adapter
- Mount the pre-filter housings
- Install the RO membrane housing
- Connect the storage tank
- Install the faucet
- Connect the drain line
- Flush the system
- Test water quality
Each stage builds on the previous one, so skipping ahead often causes leaks or air pockets later.
Installing Pre-Filters
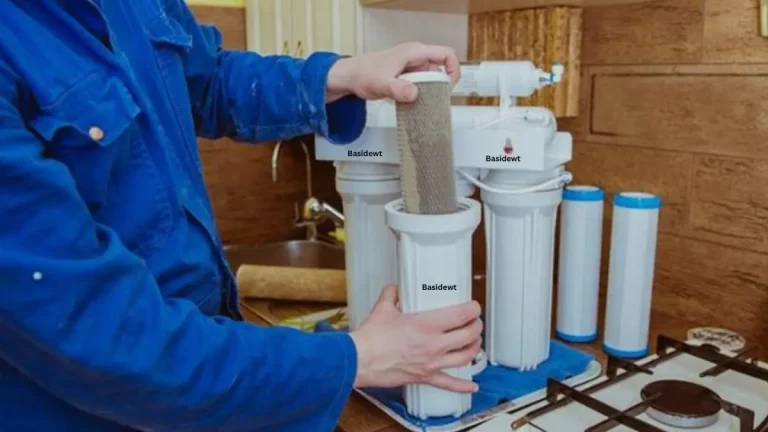
Pre-filters remove sediment and chlorine before water reaches the membrane. Mount the housings in the correct order: sediment first, then carbon.
Hand-tighten housings, then use a wrench for a quarter turn beyond that. Overtightening can crack plastic components.
Installing RO Membrane
Insert the membrane into its housing with the correct orientation, usually indicated by an arrow or marked end. Reversing it will prevent proper filtration.
Seat it firmly but avoid forcing it. If it doesn’t slide in smoothly, check for debris or misalignment in the housing.
Installing Storage Tank
Connect the tank using the supplied tank valve and tubing. Place it upright on a stable, flat surface within reach of the system.
Check the tank’s pre-charge pressure with a tire-style gauge before connecting. It should typically read around 7–8 psi when empty.
Installing Faucet
If your sink doesn’t already have a hole for a separate faucet, you’ll need to drill one. Standard holes are 1/2-inch or 3/8-inch depending on the faucet base.
Secure the faucet using the mounting nut underneath the sink, then connect the tubing to the faucet’s inlet line.
Connecting Drain Line
Attach the drain saddle to your drainpipe, ideally above the P-trap. Drill a small hole through the pipe wall using the saddle as a guide before securing it.
This connection allows wastewater from the membrane process to exit safely without affecting your home’s drainage system.
Keep the drain tubing free of sharp bends, since kinks can restrict flow and cause backpressure inside the membrane housing. A gentle, gradual slope toward the drain works best.
If local codes require an air gap fitting, install it alongside the faucet to prevent any possibility of wastewater siphoning back into the treated water line.
Flushing the System
Flushing removes manufacturing residue and air from the lines. Run the system with the storage tank valve closed for 15–20 minutes before first use.
This step protects the membrane and improves initial water taste. Skipping it is a common mistake that leads to cloudy or odd-tasting water on day one.
Testing Water Quality
After flushing, fill the tank and test the output using a TDS (Total Dissolved Solids) meter. A properly functioning system typically shows a significant reduction compared to your feed water reading.
Check for leaks at every fitting during this stage. Even a small drip can indicate a loose connection that needs another quarter turn.
Record your initial TDS readings for both feed water and treated water. This baseline makes it much easier to notice performance decline later, which usually signals it’s time to replace the membrane or filters.
Taste and clarity are also worth checking. Treated water should appear completely clear, with no cloudiness or unusual odor once the flushing stage is complete.
Common Installation Mistakes
Avoiding these errors saves time, money, and frustration:
- Installing the membrane backward
- Overtightening plastic fittings, causing cracks
- Skipping the flushing stage
- Placing the drain saddle below the P-trap
- Ignoring low water pressure warnings
- Forgetting to check the tank’s pre-charge pressure
Most of these mistakes are easy to prevent with a careful, step-by-step approach rather than rushing through setup.
Another frequent issue is mismatched tubing sizes. Mixing 1/4-inch and 3/8-inch lines without the correct adapters often leads to slow leaks that aren’t noticeable right away.
Rushing the flushing stage is equally common, especially among first-time installers eager to start using the system immediately. Patience during this step pays off in both taste and long-term reliability.
DIY vs Professional Installation
Many homeowners successfully install residential systems themselves, especially with modern quick-connect fittings. However, commercial systems usually require professional installation due to their complexity.
| Factor | DIY Installation | Professional Installation |
|---|---|---|
| Cost | Lower upfront cost | Higher upfront cost |
| Time | 1–3 hours typical | Often faster, same day |
| Skill level | Basic plumbing knowledge | Licensed technician |
| Best for | Standard under-sink units | Commercial or complex setups |
| Warranty impact | May vary by manufacturer | Often required for full warranty |
If you’re unsure which setup fits your needs, our buying guide breaks down system types based on household size and water usage.
Maintenance After Installation
Installation is just the beginning. Regular maintenance keeps your drinking water system performing efficiently for years.
Replace sediment and carbon pre-filters every 6–12 months. Membranes typically last 2–3 years depending on feed water quality and usage.
Sanitize the storage tank annually to prevent bacterial buildup. Check all fittings periodically for slow leaks that may develop over time.
Commercial systems benefit from a maintenance log tracking filter changes, pressure readings, and TDS results. This record helps identify patterns and plan replacements before performance drops noticeably.
Set calendar reminders based on your specific usage rather than generic timelines. Households with higher water consumption or poor source water quality may need more frequent filter changes than the standard schedule suggests.
Expert Tips
- Label your filter housings with installation dates for easy tracking
- Keep a spare set of O-rings on hand for quick fixes
- Test feed water pressure before purchasing a system, not after
- Schedule filter changes as calendar reminders rather than relying on memory
These small habits extend system lifespan and reduce unexpected downtime, especially in commercial environments where consistent output matters most.
Conclusion
A correct installation sets the foundation for years of reliable, great-tasting water. Following this RO Water System Installation Guide step by step helps you avoid the leaks, pressure issues, and membrane errors that cause most early system failures.
Whether you choose a DIY approach or hire a professional, understanding each stage of the process gives you more confidence and control over your system’s performance.
If you’re ready to explore options suited to your home or business, browse our full range of RO systems to find the right fit for your water needs.
RELATED POSTS
Water Softener System vs Reverse Osmosis: Which Water Treatment Solution Do You Need?
Hard Water Filter: A Complete Guide to Cleaner, Softer Water at Home
Water Softener System Maintenance: Tips to Extend Performance and Lifespan
Water Filter Housing vs Bag Filter Housing: What’s the Difference?
What Is Membrane Technology In Water Treatment