BasideWT- Whole Home Water Filtration System & Replacement


RO Water System Filter Replacement Guide: When & How to Change RO Filters
RO water system filter replacement is one of the most important habits any owner can build. Without it, even the best-built unit will slowly lose its ability to produce clean, safe drinking water. If you have ever wondered why your water tastes different or your flow rate has dropped, the filters are usually the first place to look.
This guide walks through when to change each filter stage, what warning signs to watch for, and how to complete the replacement correctly. Whether you manage a home unit or a commercial system for a facility, understanding this process protects both your water quality and your long-term investment.
RO Water System Filter Replacement: When Should You Change Your Filters?
In short, most RO water system filter replacement schedules fall between six months and two years, depending on the filter stage and your local water conditions. Sediment and carbon pre-filters usually need attention every six to twelve months. The RO membrane itself often lasts two to three years when properly maintained.
Timely replacement matters because every filter stage has a limited capacity. Once a filter reaches its saturation point, it stops removing contaminants effectively. Instead of protecting your system, an old filter can actually become a source of bacterial growth or reduced performance. Consequently, sticking to a replacement schedule is not optional maintenance; it is essential to keeping your drinking water system safe.
If you already have a general maintenance routine in place, this article works alongside our broader RO water system maintenance guide to help you focus specifically on filter timing and technique.
For OEM buyers, distributors, and facility managers, filter replacement schedules also affect procurement planning. Ordering replacement cartridges in advance, rather than reactively, keeps commercial systems running without unexpected downtime. This is especially important for businesses that depend on a steady supply of purified water throughout the day.
Why Regular Filter Replacement Matters
Every component in a reverse osmosis filter replacement plan serves a purpose, and skipping that plan creates a chain reaction of problems throughout the system. Understanding how an RO water system works makes it easier to see why each filter stage matters and why neglecting one stage affects the entire process.
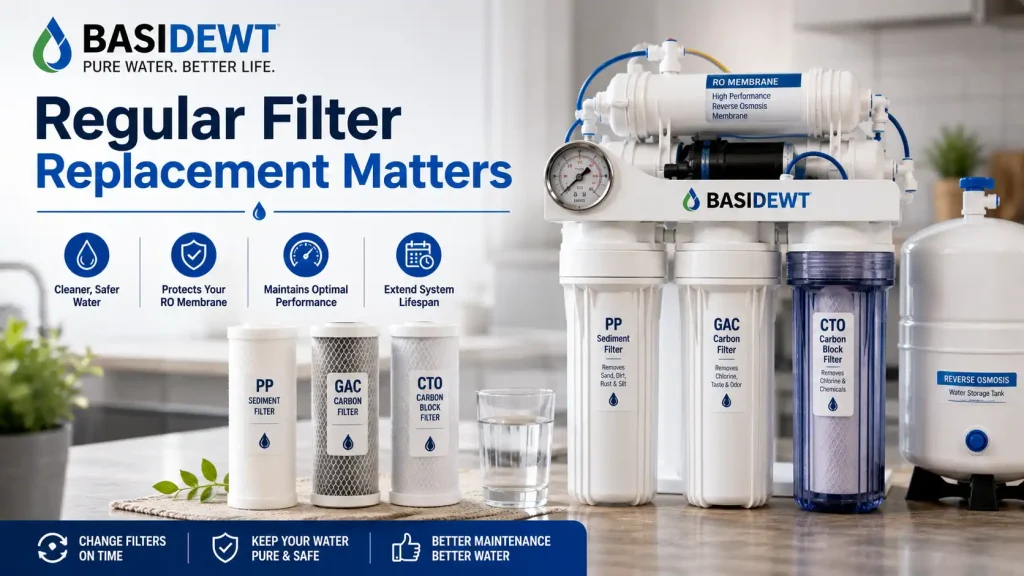
Water quality suffers first. As filters age, they lose their ability to trap sediment, chlorine, and other contaminants. This means water passing through to the membrane carries a heavier load than it should.
Membrane protection depends heavily on upstream filters doing their job. Sediment and carbon filters exist largely to shield the RO membrane from damage. When they fail, the membrane wears out faster and becomes far more expensive to replace than a simple filter.
Flow rate naturally declines as filters clog. A system that once filled a glass in seconds may start to feel sluggish, which often signals that a filter change is overdue.
Operating efficiency also depends on filter condition. A clogged filter forces the pump and membrane to work harder, which increases energy use and mechanical strain over time.
Long-term cost savings come from staying ahead of these issues. Replacing a low-cost sediment filter is far cheaper than replacing an entire RO membrane damaged by neglect.
| Factor | With Timely Filter Replacement | Without Timely Filter Replacement |
|---|---|---|
| Water Taste and Odor | Clean and consistent | Metallic, chlorine-like, or musty |
| Flow Rate | Steady and efficient | Slow and inconsistent |
| Membrane Lifespan | Extended, often 2–3 years | Shortened, sometimes under 1 year |
| Total Cost Over Time | Lower, predictable expenses | Higher due to premature part failure |
| System Efficiency | Optimal pump and energy performance | Increased strain and energy waste |
This comparison shows why filter replacement should never be treated as an afterthought. It directly affects nearly every aspect of your water purification system’s performance.
Recommended RO Filter Replacement Schedule
Each stage in your RO water system has its own expected lifespan. While actual timing depends on your water source and daily usage, these general guidelines apply to most residential and light commercial setups.
Sediment filter. This first-stage filter removes dirt, rust, and larger particles before they reach the rest of the system. Most sediment filters need replacement every six to twelve months. Homes with well water or older pipes often need to replace this filter more frequently.
Carbon filter. Positioned after the sediment stage, the carbon filter removes chlorine, chemicals, and odors that would otherwise damage the membrane. This filter typically lasts six to twelve months as well, though heavily chlorinated municipal water can shorten that window.
RO membrane. As the heart of the system, the membrane usually lasts two to three years under normal conditions. Because this stage is more technical, many buyers review our RO water system buying guide when selecting a replacement membrane that matches their original specifications.
Post carbon filter. This final polishing stage improves taste right before water reaches your tap. It generally needs replacement every twelve months, since it handles a smaller volume of water than the earlier stages.
Commercial systems and high-usage households should always check filter condition more often than these general timelines suggest, since heavier daily use accelerates saturation.
| Filter Stage | Average Lifespan | Primary Function |
|---|---|---|
| Sediment Filter | 6–12 months | Removes dirt, rust, and larger particles |
| Carbon Filter | 6–12 months | Removes chlorine, chemicals, and odors |
| RO Membrane | 2–3 years | Removes dissolved solids and fine contaminants |
| Post Carbon Filter | 12 months | Polishes taste before water reaches the tap |
Water hardness also plays a role in these timelines. Homes and facilities with hard water often see faster scale buildup on the membrane, which can shorten its effective lifespan if a water softener or pre-treatment step is not part of the setup. Checking your local water report once a year helps you anticipate these changes before they affect performance.
Signs Your RO Water System Filters Need Replacement
Even with a schedule in place, it helps to recognize warning signs that a filter needs attention sooner than expected.
Slow water flow is one of the clearest indicators. If your dispenser takes noticeably longer to fill a glass, a clogged sediment or carbon filter is often the cause.
Bad taste or odor usually points to a saturated carbon filter that can no longer absorb chlorine and organic compounds. Fresh RO water should taste clean and neutral.
Higher TDS readings on a water quality meter suggest that the membrane or pre-filters are no longer removing dissolved solids effectively. Regular TDS testing is one of the simplest ways to catch this early.
Reduced water production means your system is generating less purified water per cycle than it used to. This often happens gradually, so comparing production over several months reveals the trend more clearly than a single check.
Strange noises, including unusual humming or clicking from the pump, can indicate that filters are restricting flow and forcing the system to work harder than designed.
Visible sediment in your water or inside the filter housing is a direct sign that the sediment stage has reached capacity and needs immediate replacement.
If you notice several of these signs together, it may indicate a broader issue beyond filter age. Our guide on common RO water system problems covers troubleshooting steps for situations that go beyond routine filter replacement.
Step-by-Step RO Water System Filter Replacement Process
Replacing RO filters is a straightforward process once you understand the sequence. Following these steps carefully helps avoid leaks, contamination, or accidental damage.
- Turn off the water supply. Locate the feed water valve and shut it off completely before opening any housing.
- Release system pressure. Open the faucet at your sink and let it run until the flow stops. This releases pressure trapped inside the system.
- Unplug the unit if applicable. For systems with an electric pump, disconnect power before proceeding.
- Open the filter housing. Use a housing wrench if needed, then remove the old filter cartridge carefully to avoid spilling residual water.
- Inspect the housing. Check for cracks, mineral buildup, or debris before installing the new filter. Rinse the housing with clean water if necessary.
- Install the new filter. Make sure the replacement matches the correct stage and size. Check that O-rings are seated properly to prevent leaks.
- Reassemble and restore water supply. Tighten the housing, turn the water supply back on, and check every connection point for leaks.
- Flush the system. Run water through the new filter for several minutes before drinking it. This clears out any manufacturing residue and stabilizes flow.
Anyone installing a full system for the first time should reference our detailed RO water system installation guide, since correct initial setup makes future filter changes much easier.
Safety tip: Always wash your hands before handling filters, and avoid touching the inside of the cartridge or housing to prevent introducing bacteria into the system.
Common Filter Replacement Mistakes to Avoid
Many performance problems trace back to small mistakes made during filter replacement.
Delaying replacement to save money often backfires, since a worn filter can damage the more expensive membrane stage.
Using incorrect filter sizes creates poor seals, which leads to leaks or bypassed filtration. Always confirm compatibility before purchasing.
Skipping the flush step after installation can leave loose carbon particles or manufacturing residue in your first few glasses of water.
Forgetting to check O-rings is a frequent cause of slow leaks that go unnoticed until they cause water damage nearby.
Mixing filter stages by installing a carbon filter where a sediment filter belongs disrupts the entire filtration sequence and reduces overall efficiency.
Ignoring water pressure after replacement can hide a poorly seated housing. Always check for consistent flow and no dripping around the housing seams.
Overtightening the housing is another common error. Applying excessive force can crack the housing or damage the threads, leading to leaks that are difficult to trace. A firm, snug fit is usually enough.
Reusing old O-rings when installing a new filter may seem like a minor shortcut, but worn seals are a leading cause of slow, hidden leaks. Replacing them along with the filter is a small step that prevents bigger problems later.
Avoiding these mistakes helps your reverse osmosis filter replacement go smoothly and protects the system for years to come.
Expert Tips to Extend Filter Life
A few simple habits can meaningfully extend the lifespan of every filter stage.
For residential users, testing your water source periodically helps you understand whether high sediment or chlorine levels are shortening filter life faster than average. Installing a pre-filter for well water, for example, can significantly reduce strain on the sediment stage.
For commercial buyers, tracking usage volume rather than relying solely on calendar time gives a more accurate picture of when filters actually need replacement. High-traffic facilities often benefit from setting production-based replacement triggers instead of fixed monthly schedules.
According to the Water Quality Association, consistent monitoring of water quality parameters helps identify filtration needs before performance visibly declines, which supports both of these approaches.
Other useful habits include keeping spare filters on hand to avoid delays, labeling installation dates directly on each cartridge, and scheduling quarterly system checks even between full replacements. These small steps make a noticeable difference in long-term system reliability.
Distributors and importers who supply replacement parts to multiple clients often find it helpful to standardize filter sizing across product lines. This reduces confusion for end users and simplifies inventory management, particularly when serving both residential and commercial customers with different usage patterns.
Finally, water pressure consistency plays a bigger role than many owners realize. Pressure that fluctuates significantly can cause filters to wear unevenly, so installing a pressure regulator ahead of the RO water system is worth considering in areas with unstable municipal supply.
Conclusion
RO water system filter replacement is the foundation of consistent, high-quality drinking water. By understanding each filter’s expected lifespan, recognizing early warning signs, and following a careful replacement process, you protect both your membrane and your overall investment.
Staying proactive rather than reactive keeps your system running efficiently and helps you avoid costly repairs down the road. For a complete overview of how every component works together, explore our full RO water system guide, or browse our range of RO systems designed for dependable, long-term performance.
RELATED POSTS
How Does a Water Filter System Work? Step-by-Step Guide
Why Choose a Whole House RO System? Benefits, Costs & Installation
Pure Water Window Cleaning: Equipment, Process and Benefits
What Is a Water Filter Housing? Complete Guide to Uses, Types & Benefits
DI Water System For Window Cleaning