BasideWT- Whole Home Water Filtration System & Replacement


Common Water Filter Housing Problems: Causes, Solutions & Prevention
Common water filter housing problems often begin with small issues like leaks, cracked housings, worn O-rings, or low water pressure. If ignored, these problems can lead to expensive repairs and unexpected system failure. This guide explains the most common water filter housing problems, their causes, practical solutions, and prevention tips to keep your filtration system operating safely and efficiently.
This guide walks through the most common water filter housing problems homeowners, technicians, and industrial buyers run into. You will learn why housings fail, how to troubleshoot each issue safely, and when repair makes more sense than replacement.
If you are still comparing housing types before buying, our complete guide to water filter housing types, sizes, and materials is a useful starting point. This article picks up where that one leaves off, focusing purely on troubleshooting.
What Are the Most Common Water Filter Housing Problems?
Most housing complaints fall into a short list of categories. Understanding this list first makes diagnosis much faster.
The most frequent issues include:
- Leaking around the housing cap or fittings
- Cracked or stress-fractured housing bodies
- Reduced water pressure after installation
- Housing that will not open or close properly
- O-ring failure and seal degradation
- Pressure build-up trapped inside the housing
- Thread damage from overtightening
- Premature housing failure from UV or freeze exposure
Each of these has a specific root cause. Guessing rarely fixes the problem permanently, so it helps to understand why housings fail before jumping to a solution.
Why Water Filter Housings Fail
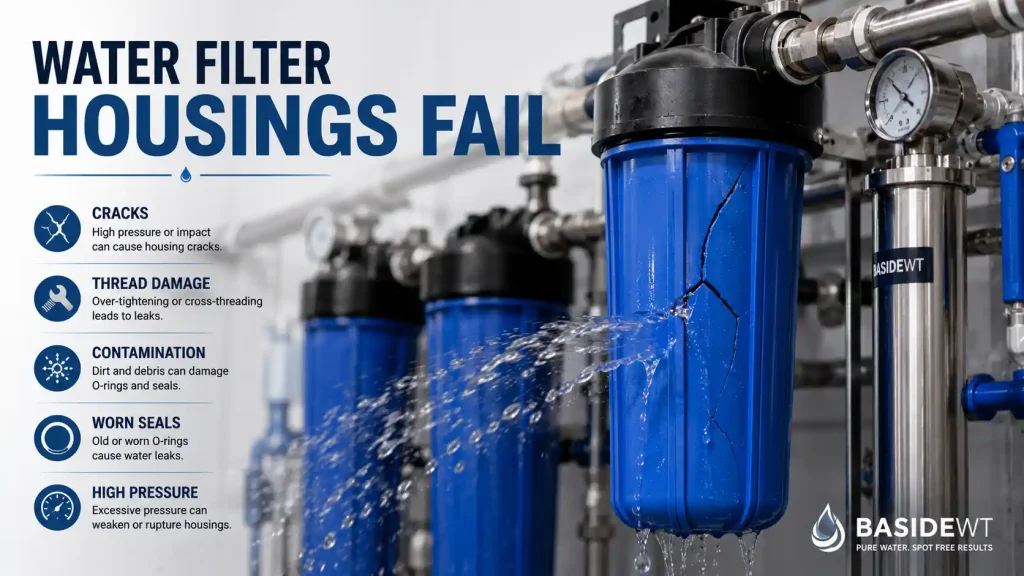
Housing failure almost always traces back to one of a few mechanical or environmental stressors. Knowing which one applies to your system saves time and money.
High water pressure. Municipal supply lines can spike well above a housing’s rated pressure, especially during off-peak hours. Repeated spikes stress the housing walls and seals over time.
Incorrect installation. A housing mounted out of level, or installed with unsupported piping, transfers extra load onto the threads and cap. That stress eventually shows up as leaks or cracks.
Worn O-rings. Rubber seals harden and lose elasticity with age, heat, and chlorine exposure. A worn O-ring is the single most common cause of housing leaks.
Overtightening. Many installers assume tighter means safer. In reality, excessive force compresses the O-ring past its working range and can crack the housing threads.
Low-quality cartridges. Cartridges that do not match the housing dimensions can shift, bypass, or restrict flow, adding pressure stress the housing was never designed for.
Incorrect housing size. An undersized housing restricts flow and raises internal pressure. An oversized one wastes cartridge life and can leave gaps around the seal.
Freezing temperatures. Water expands as it freezes. A housing left outdoors or in an unheated space during winter can crack from the inside out.
UV exposure. Clear plastic housings installed in direct sunlight degrade faster. UV breaks down the polymer, making the housing brittle and prone to stress cracks.
Water Filter Housing Leaking: Causes and Solutions
Leaking is the complaint technicians hear most often, and it usually comes from one of four locations: the cap seal, the inlet and outlet fittings, the pressure relief button, or a hairline crack in the housing body.
Start by shutting off the water supply and depressurizing the system before touching anything. Then open a downstream faucet until flow stops completely.
Cap seal leaks. Remove the housing with a proper filter wrench, not pliers or a pipe wrench, since these tools can distort the cap. Inspect the O-ring for flat spots, nicks, or dirt in the groove. Clean the groove, apply a thin coat of food-grade silicone lubricant, and reseat the O-ring evenly before closing the cap.
Fitting leaks. Loose threaded connections are common after a few pressure cycles. Reapply PTFE tape or thread sealant rated for potable water, then hand-tighten before a final quarter-turn with a wrench.
Pressure relief button leaks. Press the button several times while the system is pressurized to flush out trapped debris. If leaking continues, unscrew the button assembly, clean the internal O-ring, lubricate it, and reinstall.
Hairline cracks. These almost always mean replacement, not repair. Epoxy or sealant patches are not safe for a pressurized drinking water system and will fail again.
For a deeper comparison of housing materials that resist leaks better over time, see our article on plastic versus stainless steel water filter housings.
Cracked Water Filter Housing: What Causes It?
A cracked housing is a safety issue, not a cosmetic one. Continuing to run a cracked housing under pressure risks a sudden failure.
Cracks typically start at stress points: the base of the threads, the corner where the sump meets the cap, or anywhere the housing was overtightened during a previous cartridge change.
Common causes include:
- Repeated overtightening across multiple filter changes
- Water hammer from valves closing too quickly
- Freeze damage from unheated installation locations
- UV degradation on clear plastic housings
- Manufacturing defects in low-grade plastic resin
- Impact damage during shipping or installation
Water hammer deserves special attention here. When a fast-closing valve stops flow abruptly, the resulting pressure spike can hit several times the normal operating pressure in a fraction of a second. Over months of cycling, this repeated shock fatigues the plastic and initiates cracks that are invisible until they suddenly are not.
If cracking recurs across several housings on the same system, the pressure rating of the housing itself may not match your supply conditions. Our guide to water filter housing pressure ratings explains how to match housing specs to real-world pressure conditions.
Low Water Pressure After Filter Installation
A drop in household water pressure right after installing a new housing is almost always a flow restriction problem, not a leak.
Check these areas in order:
- Cartridge micron rating. A finer micron rating catches more particles but also restricts flow more. If pressure dropped sharply, the cartridge may be too fine for your water quality.
- Clogged cartridge. Sediment-heavy water clogs cartridges faster than expected. Inspect and replace on a shorter cycle if this keeps happening.
- Undersized housing. A housing rated below your household’s peak flow rate will always restrict pressure, regardless of cartridge condition.
- Trapped air. New installations sometimes trap air pockets that mimic low pressure symptoms. Bleed the system by opening the nearest faucet slowly after installation.
Whole-house systems are particularly sensitive to sizing mistakes, since they handle the full household flow rate at once. Our article on whole-house water filter housings covers sizing in more detail for that specific use case.
Housing Stuck and Difficult to Open
A housing that will not budge usually means the O-ring has bonded slightly to the threads, or the cap was overtightened during the last service.
Try these steps in order:
- Use a proper filter wrench designed for your housing’s cap diameter. Hand grip alone rarely generates enough torque safely.
- Tap gently around the cap with a rubber mallet to break the seal’s static friction, never strike the threads directly.
- Pour warm water over the cap joint for a minute to slightly expand the plastic and loosen the grip.
- Avoid metal tools like pipe wrenches, which can round off the cap flats or crack the plastic.
If the housing still will not open after these steps, do not force it. Excess torque at this stage is a common cause of cracked caps. A dedicated filter wrench sized correctly for the housing makes this task considerably safer and reduces the risk of damaging the threads.
O-Ring Problems and Water Leaks
The O-ring is a small part, but it does most of the work keeping a housing watertight. Most seal failures come down to one of the following:
| O-Ring Problem | What It Looks Like | Fix |
|---|---|---|
| Dried out | Cracked, brittle surface | Replace and lubricate |
| Flattened | No longer round in cross-section | Replace |
| Stretched | Loose in the groove | Replace with correct size |
| Dirty groove | Grit or old rubber debris | Clean groove before reseating |
| Wrong material | Swelling or premature wear | Match O-ring material to water chemistry |
Lubrication matters more than most people expect. A dry O-ring twists and pinches as the cap threads engage, which creates uneven compression and micro-leaks. Food-grade silicone grease keeps the rubber supple and lets it seat evenly every time.
Cartridge compatibility plays a role too. A cartridge that does not sit flush against the housing base can push the O-ring slightly out of position, causing a leak that looks like a seal problem but is actually a fitment issue.
Pressure Build-Up Inside the Housing
Trapped pressure inside a housing is dangerous to work on and is often mistaken for a stuck cap. Before assuming the cap is jammed, always confirm the system has been fully depressurized.
Signs of trapped pressure include a cap that will not turn even slightly, water spraying from the relief button when pressed, or a hissing sound when the cap is loosened slightly.
To release trapped pressure safely:
- Shut off the incoming water supply at the valve before the housing.
- Open a downstream faucet and let it run until flow stops.
- Press the pressure relief button, if the housing has one, and hold until hissing stops.
- Only then attempt to loosen the cap, slowly, keeping a hand ready to stop if pressure remains.
Housings without a pressure relief button need extra caution. In that case, always confirm the shutoff valve is fully closed and the downstream faucet has been open for at least a minute before touching the cap.
Troubleshooting Checklist Before Replacing the Housing
Before assuming a housing needs full replacement, work through this checklist. Many problems that look like housing failure are actually seal, cartridge, or installation issues.
| Problem | Possible Cause | Recommended Solution |
|---|---|---|
| Leaking at cap | Worn or dry O-ring | Clean, lubricate, or replace O-ring |
| Leaking at fittings | Loose threads or old tape | Reseal with PTFE tape, tighten properly |
| Cracked body | Overtightening, freeze, or UV damage | Replace housing, do not patch |
| Low pressure | Clogged cartridge or undersized housing | Replace cartridge or upsize housing |
| Cap stuck | Dried O-ring or overtightening | Use filter wrench, apply warm water |
| Trapped pressure | Relief button clogged or missing step | Depressurize fully before opening |
| Thread damage | Cross-threading or wrench misuse | Inspect threads, replace if stripped |
| Discolored water after service | Debris in housing or new cartridge sediment | Flush system for several minutes |
Working through each row systematically avoids replacing a perfectly good housing when the real problem is a five-dollar O-ring.
How to Prevent Future Water Filter Housing Problems
Most housing failures are preventable with a simple, consistent maintenance routine. A few habits make a significant difference over the housing’s lifespan.
Follow a maintenance schedule. Inspect O-rings and clean the housing interior at every cartridge change, typically every three to six months depending on water quality.
Hand-tighten, then use a wrench for a partial turn only. Overtightening is one of the most preventable causes of cracked housings and damaged threads.
Match cartridge specs to the housing. Always confirm micron rating, diameter, and length before purchasing replacement cartridges.
Protect against freezing. Insulate housings in unheated spaces, or install a heat trace cable in colder climates.
Shield clear housings from direct sunlight. UV-blocking sleeves or indoor installation locations extend housing lifespan considerably.
Install a pressure regulator. If incoming pressure regularly exceeds the housing’s rating, a regulator protects the entire system, not just the filter.
Keep spare O-rings on hand. A quick seal replacement at the first sign of wear prevents a minor issue from becoming a full housing failure.
When Should You Repair or Replace the Housing?
Not every problem calls for a new housing. Use this general rule: if the fault is limited to a seal, fitting, or debris, repair it. If the fault involves the structural body of the housing, replace it.
Repair is usually appropriate for:
- O-ring wear or damage
- Loose or leaking fittings
- Clogged pressure relief buttons
- Minor thread wear that still seals properly
Replacement is the safer choice for:
- Any visible crack, no matter how small
- Stripped or cross-threaded cap threads
- Housing age beyond the manufacturer’s rated lifespan, typically five to ten years depending on material and conditions
- Repeated leaks after multiple seal replacements, which usually points to a structural issue
For industrial or high-flow systems, downtime costs often make replacement the more economical choice even when a repair is technically possible. Our guide to industrial water filter housings covers selection criteria for buyers managing larger systems where reliability is critical.
Expert Recommendations
Experienced technicians tend to follow a few consistent habits that reduce housing failures across both residential and industrial systems.
Always depressurize before servicing, without exception. Even a small amount of trapped pressure can cause a cap to spin off unexpectedly.
Replace O-rings proactively rather than reactively. Waiting for a visible leak means the seal has already been failing for some time.
Log pressure readings periodically, especially on industrial systems where pressure spikes are common but not always obvious without monitoring.
Match housing material to the application. Clear plastic works well indoors away from sunlight, while stainless steel or UV-stabilized materials suit harsher environments better.
For deeper technical background on O-ring sealing behavior and maintenance intervals, Eaton’s filtration equipment maintenance documentation offers useful engineering detail on gasket and seal care in pressurized filter systems.
Final Thoughts
Most water filter housing problems trace back to a handful of root causes: worn seals, incorrect pressure, poor installation, or environmental stress. Catching these early through routine inspection prevents the majority of leaks, cracks, and pressure failures.
When in doubt, work through the troubleshooting table before assuming the housing itself has failed. A five-minute O-ring check often solves what looks like a major problem.
If your system needs a replacement housing built for reliable long-term performance, browse our range of water filter housings to find the right fit for your application.
RELATED POSTS

UF Membrane Operating Pressure, Flow Rate & Temperature Guide
RO Membrane Replacement: When, Why & How to Replace It
UV Water Sterilizer vs RO: What’s the Difference and Which Is Better?
Deionized Water System: The Complete Guide for Car Wash, Window Cleaning & Industrial Use
UF Membrane Troubleshooting: Low Flow, Fouling & Poor Performance